
False eyelashes can instantly transform your look by adding length, volume, and drama to your eyes. Whether you’re preparing for a wedding, party, photoshoot, or simply want to elevate your everyday makeup, learning how to apply false eyelashes step by step can make the process easier and more natural-looking.
If you’re new to falsies, don’t worry. This detailed guide walks you through every step, from preparation to removal, along with a helpful tools table and FAQs to ensure flawless results.
Why Wear False Eyelashes?
False lashes enhance your natural beauty by:
- Making eyes appear bigger and more defined
- Adding volume to sparse lashes
- Elevating simple makeup looks
- Creating a glamorous finish for special occasions
When applied correctly, they look seamless and feel comfortable.
Tools You Need Before You Start
Before learning how to apply false eyelashes step by step, gather the right tools.
| Tool/Item | Purpose | Why It’s Important |
|---|---|---|
| False Eyelashes | Adds length and volume | Main product |
| Lash Glue | Secures lashes in place | Ensures long wear |
| Tweezers or Applicator | Precise placement | Better control |
| Small Scissors | Trim lashes to fit eye shape | Natural appearance |
| Eyeliner | Hides lash band | Seamless blend |
| Mascara | Blends natural and false lashes | Unified finish |
| Mirror | Clear view during application | Accurate positioning |
Having everything ready prevents mistakes and makes application smoother.
Step-by-Step Guide to Applying False Eyelashes
Step 1: Measure and Trim the Lashes
Take the lash strip out of the packaging and gently bend it to loosen stiffness. Place it along your lash line without glue to measure the fit.
If the strip is too long, trim from the outer edge — never from the inner corner. This ensures a comfortable and natural fit.
Step 2: Apply a Thin Line of Lash Glue
Squeeze a small amount of glue onto the lash band. Spread it evenly from corner to corner.
Important tip: Wait 20–30 seconds until the glue becomes tacky. Applying it while wet can cause slipping and misplacement.
Step 3: Position the Lash Strip
Using tweezers or your fingers, place the lash strip as close to your natural lash line as possible.
Start by positioning the center first, then adjust the inner and outer corners.
Step 4: Press and Secure
Gently press along the lash band to secure it in place. Focus on the inner and outer corners since these areas tend to lift first.
Look down into a mirror while applying — this gives you better visibility and control.
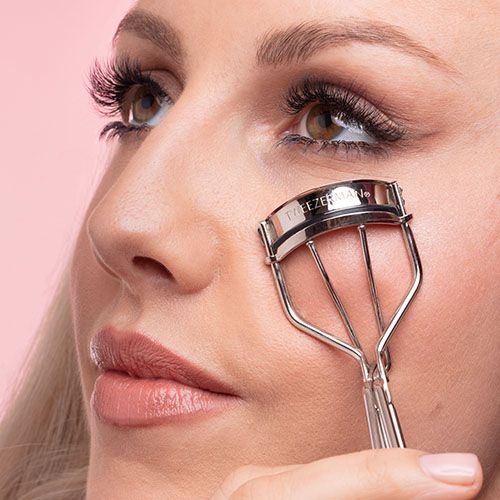
Step 5: Blend with Eyeliner and Mascara
Once the lashes are secure:
- Apply a thin line of eyeliner to hide the lash band.
- Lightly coat your natural lashes with mascara to blend them with the false lashes.
This step creates a seamless, professional finish.
Common Mistakes to Avoid
Even with a guide on how to apply false eyelashes step by step, beginners often make these errors:
- Applying glue and placing lashes immediately (without waiting for tackiness)
- Using too much glue
- Not trimming lashes to fit eye shape
- Placing lashes too high above the natural lash line
- Skipping eyeliner to blend the band
Avoiding these mistakes ensures a more natural and comfortable result.
Choosing the Right Type of False Eyelashes
There are several types of false lashes available:
Strip Lashes
Best for beginners and quick application.
Individual Lashes
More natural-looking but require more time and precision.
Magnetic Lashes
No glue needed; ideal for sensitive eyes.
Wispy Lashes
Perfect for everyday glam.
Dramatic Volume Lashes
Best for events and photoshoots.
Choose based on the occasion and your comfort level.
How to Make False Lashes Look Natural
To avoid an artificial look:
- Choose lashes that suit your eye shape
- Trim for proper fit
- Apply thin eyeliner
- Avoid overly dramatic styles for daytime wear
Pairing well-applied lashes with a balanced makeup routine enhances the overall look. For example, maintaining healthy skin through a Skincare Routine for Women Over 40 helps create a smooth base, making eye makeup stand out beautifully.
How to Remove False Eyelashes Safely
Removing lashes correctly prevents damage to your natural lashes.
Step-by-Step Removal:
- Gently loosen the outer corner.
- Slowly peel off the strip toward the inner corner.
- Remove excess glue from the lash band.
- Clean and store lashes properly for reuse.
Never pull lashes forcefully, as this can damage your natural lashes.
How to Reuse False Eyelashes
High-quality lashes can be reused multiple times if cared for properly.
- Remove glue residue after each use
- Clean gently with micellar water (avoid soaking)
- Store in original packaging
- Avoid applying mascara directly on reusable lashes
Proper maintenance extends their lifespan and keeps them hygienic.
Tips for Beginners
If you’re new to falsies:
- Practice before an important event
- Choose lightweight lashes
- Use clear glue for easier blending
- Work in good lighting
Confidence improves with practice.
How Long Do False Eyelashes Last?
- Strip lashes: 1 day (removable)
- Individual cluster lashes: 2–5 days depending on glue
- Professional extensions: 2–4 weeks
For daily wear, strip lashes are the safest and most flexible option.
FAQs About Applying False Eyelashes
1. Are false eyelashes safe?
Yes, when applied and removed properly, they are safe for most people.
2. Can I wear false lashes every day?
Yes, but give your natural lashes occasional breaks to maintain their health.
3. What type of glue is best?
Latex-free glue is best for sensitive eyes.
4. Why do my lashes keep lifting at the corners?
You may not be using enough glue or waiting for it to become tacky before applying.
5. Should I apply lashes before or after eyeshadow?
Apply eyeshadow first, then lashes, and finish with eyeliner.
6. Do false eyelashes damage natural lashes?
They can if removed aggressively or if glue is misused. Proper removal prevents damage.
Final Thoughts
Learning how to apply false eyelashes step by step takes patience, but once mastered, it becomes a quick and simple part of your beauty routine. With the right tools, proper technique, and practice, you can achieve salon-quality results at home.